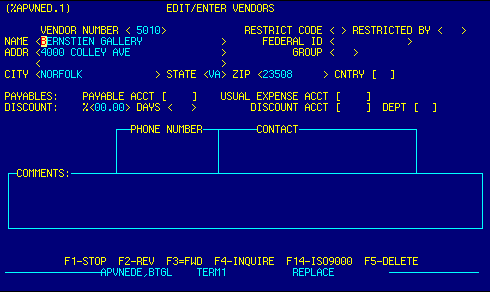
Vendor Number |
Vendor numbers are automatically assigned by the system. | Top |
Restriction Code |
Top | |
Restricted By |
Top | |
Name |
Enter vendor name. | Top |
Federal ID |
Enter vendor federal tax id (IRS) number. | Top |
Address |
Enter vendor address. | Top |
Group |
Top | |
City |
Enter vendor city. | Top |
State |
Enter vendor state. | Top |
Zip Code |
Enter vendor zip code. | Top |
Country |
Enter vendor country
OR F4 to display Country Locator to select and retrieve valid data. |
Top |
Payable Account |
Enter payable account for this vendor
OR F4 to display Chart of Accounts Locator to select and retrieve valid data. |
Top |
Usual Expense Account |
Enter expense account usually associated with vendor
OR F4 to display Chart of Accounts Locator to select and retrieve valid data. |
Top |
Discount % |
Enter percentage of any discount allowed for vendor. | Top |
Days |
Top | |
Discount Account |
Enter discount account associated with vendor
OR F4 to display Chart of Accounts Locator to select and retrieve valid data. |
Top |
Department |
Enter department usually associated with vendor
OR F4 to display Chart of Accounts Locator to select and retrieve valid data. |
Top |
Phone Numbers |
Enter vendor phone number. This table allows
multiple numbers to be entered.
To add a phone number scroll to the end of the table with F3
to append a new phone number to the end of the table
To delete a phone number place the cursor on the line to be deleted, press the Delete key repeatedly to erase the line. Whether entering, editing, or deleting, press the enter key to confirm your action. |
Top |
Contacts |
Enter vendor contact name. This table allows
multiple contact names to be entered.
To add a contact name scroll to the end of the table with F3
to append a new name to the end of the table
To delete a contact name place the cursor on the line to be deleted, press the Delete key repeatedly to erase the line. Whether entering, editing, or deleting, press the enter key to confirm your action. |
Top |
Comments |
Enter any comments about this vendor.
This table allows multiple comments to be entered.
To add a comment scroll to the end of the table with F3
to append a new comment to the end of the table
To delete a comment place the cursor on the line to be deleted, press the Delete key repeatedly to erase the line. Whether entering, editing, or deleting, press the enter key to confirm your action. |
Top |
NAVIGATION |
Press a function key
F1 - Stop Return to calling screen
See Getting Started - Scrolling, Toggling, or Locating table data for information on these navigation techniques. |
Top |
STATUS |
Read only.
See Getting Started - Basic Screen Elements for more information. |
Top |
SCREEN ID |
Read only.
See Getting Started - Basic Screen Elements for more information. |
Top |
SCREEN NAME |
Read only.
See Getting Started - Basic Screen Elements for more information. |
Top |