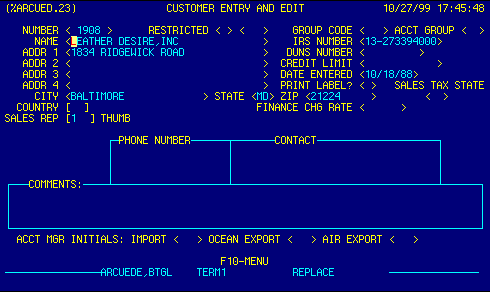
Number |
Customer numbers may be assigned manually by the
user or generated automatically by the system.
To display data about an existing customer: Enter their customer number.
|
Top |
Restricted Type |
This field may only be set by authorized managers. Valid
options are 'X' and 'R'.
X prevents the customer from being used in any application.
|
Top |
Restricted By |
Initials of restricting manager. | Top |
Group Code |
Customer Groups are created by assigning several customers the same 3-letter Group Code. You will then be able to print various reports for a group of customers. | Top |
Account Group |
Account Groups are created by assigning several customers the same 3 letter Account Code. Similar to Group Codes, Account Groups are used for linking customers in the accounting programs. | Top |
Name |
Enter customer name up to 32 characters in this field. | Top |
IRS Number |
Enter customer Internal Revenue Service, Social Security,
or Customs assigned number.
In these codes, N = number, X = alphanumeric, YY = the last two digits of the calendar year when the number is assigned, and DDPP = the Customs district/port code where the number is assigned. |
Top |
Address |
Enter the Customer's address.
Up to 4 lines may be entered, however, some forms will only accommodate
the 1st 2 lines.
If this is an importer, this field must contain the mailing address. If the mailing address is a post office box, a second address must be provided on the Customer ABI Info screen. |
Top |
DUNS Number |
Enter customer's DUNS number. This number is used in EDI
and AES applications.
See Dun & Bradstreet for more information. |
Top |
Credit Limit |
Enter customer credit limit. | Top |
Date Entered |
Enter the date customer data is entered.
See Getting Started - Dates for more information regarding date input. |
Top |
Print Label |
This field indicates the mailing list group associated with the customer. | Top |
City |
Enter customer city. | Top |
State |
Enter customer state. | Top |
Zip |
Enter customer zip code. (5 or 9 digit zips allowed). | Top |
Sales Tax State |
If sales tax applies to transactons with this customer, enter applicable state. | Top |
Country |
Enter customer country
OR F4 to display Country Locator to select and retrieve valid data. |
Top |
Finance Charge Rate |
Enter rate for finance charges. | Top |
Sales Rep |
Enter customer's sales representative. This field is used
to calculate sales commissions.
Access to this field is restricted to authorized managers. |
Top |
Phone |
Enter customer phone number. This table allows
multiple numbers to be entered.
To add a phone number scroll to the end of the table with F3
to append a new phone number to the end of the table
To delete a phone number place the cursor on the line to be deleted, press the Delete key repeatedly to erase the line. Whether entering, editing, or deleting, press the enter key to confirm your action. |
Top |
Contacts |
Enter customer contact name. This table allows
multiple contact names to be entered.
To add a contact name scroll to the end of the table with F3
to append a new name to the end of the table
To delete a contact name place the cursor on the line to be deleted, press the Delete key repeatedly to erase the line. Whether entering, editing, or deleting, press the enter key to confirm your action. |
Top |
Comments |
Enter any special comments about this customer.
This table allows multiple comments to be entered.
To add a comment scroll to the end of the table with F3
to append a new comment
To delete a comment place the cursor on the line to be deleted, press the Delete key repeatedly to erase the line. Press F14 (Shift F4) to open the expanded comments screen. Whether entering, editing, or deleting, press the enter key to confirm your action. |
Top |
Account Manager's Initials |
Enter manager's initials. | Top |
Navigation |
Press a function key
F1 - Return to calling screen
See Getting Started - Scrolling, Toggling, or Locating table data for information on these navigation techniques. |
Top |
STATUS |
Read only.
See Getting Started - Basic Screen Elements for more information. |
Top |
SCREEN ID |
Read only.
See Getting Started - Basic Screen Elements for more information. |
Top |
SCREEN NAME |
Read only.
See Getting Started - Basic Screen Elements for more information. |
Top |
DATE/TIME |
Read only. Displays current system date & time.
See Getting Started - Basic Screen Elements for more information. |
Top |